9 Mei 2016

Hatsune Miku PV Blogger Template v1.1

previously I've shared a tutorial How to Add a Progress Bar with Bootstrap. Today I will share a template for PV themed blue with pictures hatsune miku. this is my first template with the theme of PV. I hope you like it. by post grid design, custom post pv, defer videos and so forth. but I forgot to add the widget in footer maybe next version I will add the widget in footer.
Example Post i get from http://kara-tsuru.com and header image from konachan.net
Hatsune Miku PV Blogger Template v1.1
Cmonfrozen Share Template Anime Hatsune Miku PV Blogger Template v1.1
Description Template

Hatsune Miku PV Anime Blogger Template is a template for Share PV or video like a Blog PV or Blog AMV with Custom Post for PV, and defer video for optimize loading blog.

This template is responsive, 2 column and colored blue with pictures hatsune miku from konachan.

Note : Click Button "How To Configure Template" for setting this template

Fix Lightbox : Go to HTML Editor, Add this CSS .CSS_LIGHTBOX{z-index:200!important;} before */]]></b:skin>

Document (Only) Template (Only) Live Preview How to Configure Template
  • Responsive
  • 2 Column
  • PSD Header
  • Optimize
  • SEO
  • Custom Post PV
  • Pagination
  • Spetific Label
  • Genre Dropdown
  • Search Box
  • Document
  • Remove Footer credits
Read More

6 Mei 2016

How to Add a Progress Bar with Bootstrap

How to Add a Progress Bar with Bootstrap
How to Add a Bootstrap Progress Bar 3 - today i want share bootstrap progress bar, before i already share Progress bar. but this different progress bar this use bootstrap for make a progress bar. if your blog has been no bootstrap please read the tutorial Bootstrap 3 in Blogger

How to add bootstrap progress bar in blogger ?
  1. Go To Blogger > Yourblog > Layout > Add a Gadget > HTML/Javascript
  2. Choose Style Progress Bar
Do not forget to replace the value style="width: 45%" and the aria-valuenow="45" with the number you want

Basic Progress Bar
45% Complete
<div class="progress">
<div class="progress-bar" role="progressbar" aria-valuenow="45"
aria-valuemin="0" aria-valuemax="100" style="width:45%">
<span class="sr-only">45% Complete</span>
</div>
</div>
you can add this selector for change color
progress-bar-success progress-bar-info progress-bar-warning progress-bar-danger
add after name "progress-bar"
example : "progress-bar progress-bar-danger"
<div class="progress">
<div class="progress-bar progress-bar-danger" role="progressbar" aria-valuenow="45"
aria-valuemin="0" aria-valuemax="100" style="width:45%">
45%
</div>
</div>;
45% Complete
Progress Bar With Label
45%
<div class="progress">
<div class="progress-bar" role="progressbar" aria-valuenow="45"
aria-valuemin="0" aria-valuemax="100" style="width:45%">
45%
</div>
</div>;
Progress Bar Color With Label
if you want without label change 30% Complete (success) with <span class="sr-only">30% Complete (success)</span>
30% Complete (success)
<div class="progress">
<div class="progress-bar progress-bar-success" role="progressbar" aria-valuenow="30"
aria-valuemin="0" aria-valuemax="100" style="width:30%">
30% Complete (success)
</div>
</div>
30% Complete (info)
<div class="progress">
<div class="progress-bar progress-bar-info" role="progressbar" aria-valuenow="30"
aria-valuemin="0" aria-valuemax="100" style="width:30%">
30% Complete (info)
</div>
</div>
30% Complete (warning)
<div class="progress">
<div class="progress-bar progress-bar-warning" role="progressbar" aria-valuenow="30"
aria-valuemin="0" aria-valuemax="100" style="width:30%">
30% Complete (warning)
</div>
</div>
30% Complete (danger)
<div class="progress">
<div class="progress-bar progress-bar-danger" role="progressbar" aria-valuenow="30"
aria-valuemin="0" aria-valuemax="100" style="width:30%">
30% Complete (danger)
</div>
</div>
Striped Progress Bars
30% Complete (success)
<div class="progress">
<div class="progress-bar progress-bar-success progress-bar-striped" role="progressbar" aria-valuenow="30"
aria-valuemin="0" aria-valuemax="100" style="width:30%">
30% Complete (success)
</div>
</div>
30% Complete (info)
<div class="progress">
<div class="progress-bar progress-bar-info progress-bar-striped" role="progressbar" aria-valuenow="30"
aria-valuemin="0" aria-valuemax="100" style="width:30%">
30% Complete (info)
</div>
</div>
30% Complete (warning)
<div class="progress">
<div class="progress-bar progress-bar-warning progress-bar-striped" role="progressbar" aria-valuenow="30"
aria-valuemin="0" aria-valuemax="100" style="width:30%">
30% Complete (warning)
</div>
</div>
30% Complete (danger)
<div class="progress">
<div class="progress-bar progress-bar-danger progress-bar-striped" role="progressbar" aria-valuenow="30"
aria-valuemin="0" aria-valuemax="100" style="width:30%">
30% Complete (danger)
</div>
</div>
Make Animated Progress Bar
Progress Bar Striped Animated
30% Complete
<div class="progress">
<div class="progress-bar progress-bar-striped active" role="progressbar" aria-valuenow="30"
aria-valuemin="0" aria-valuemax="100" style="width:30%">
30% Complete
</div>
</div>
Read More

4 Mei 2016

Update Meta Tag Bootstrap Template

Update Meta Tag Bootstrap Template
Update Meta Tag Bootstrap Template because someone asked template now less SEO. then I decided to follow the old meta tag that I took from template mas sugeng which I think is also seo with slight modifications, for everyone who use my templates please follow the tutorial below to change the meta tags in the template, in order to get more traffic from previous.
  1. Go to blogger > Yourblog > Edit HTML > Find HTML <head> (CTRL + F).
    <!-- Meta Tag -->
    <meta charset='utf-8'/>
    <meta content='width=device-width, initial-scale=1' name='viewport'/>
    <meta content='IE=edge' http-equiv='X-UA-Compatible'/>
    <b:if cond='data:blog.pageType == &quot;index&quot;'>
    <title><data:blog.pageTitle/></title>
    <b:else/>
    <b:if cond='data:blog.pageType == &quot;error_page&quot;'>
    <title>404: Page Not Found | <data:blog.title/></title>
    <b:else/>
    <title><data:blog.pageName/></title>
    </b:if>
    </b:if>
    <meta content='text/html; charset=UTF-8' http-equiv='Content-Type'/>
    <script type='text/javascript'>
    //<![CDATA[
    (function() { (function(){function c(a){this.t={};this.tick=function(a,c,b){var d=void 0!=b?b:(new Date).getTime();this.t[a]=[d,c];if(void 0==b)try{window.console.timeStamp("CSI/"+a)}catch(e){}};this.tick("start",null,a)}var a;window.performance&&(a=window.performance.timing);var h=a?new c(a.responseStart):new c;window.jstiming={Timer:c,load:h};if(a){var b=a.navigationStart,e=a.responseStart;0<b&&e>=b&&(window.jstiming.srt=e-b)}if(a){var d=window.jstiming.load;0<b&&e>=b&&(d.tick("_wtsrt",void 0,b),d.tick("wtsrt_",
    "_wtsrt",e),d.tick("tbsd_","wtsrt_"))}try{a=null,window.chrome&&window.chrome.csi&&(a=Math.floor(window.chrome.csi().pageT),d&&0<b&&(d.tick("_tbnd",void 0,window.chrome.csi().startE),d.tick("tbnd_","_tbnd",b))),null==a&&window.gtbExternal&&(a=window.gtbExternal.pageT()),null==a&&window.external&&(a=window.external.pageT,d&&0<b&&(d.tick("_tbnd",void 0,window.external.startE),d.tick("tbnd_","_tbnd",b))),a&&(window.jstiming.pt=a)}catch(k){}})();window.tickAboveFold=function(c){var a=0;if(c.offsetParent){do a+=c.offsetTop;while(c=c.offsetParent)}c=a;750>=c&&window.jstiming.load.tick("aft")};var f=!1;function g(){f||(f=!0,window.jstiming.load.tick("firstScrollTime"))}window.addEventListener?window.addEventListener("scroll",g,!1):window.attachEvent("onscroll",g);
    })();
    //]]>
    </script>
    <meta content='blogger' name='generator'/>
    <link expr:href='data:blog.homepageUrl + &quot;favicon.ico&quot;' rel='icon' type='image/x-icon'/>
    <link expr:href='data:blog.url' rel='canonical'/>
    <link expr:href='data:blog.homepageUrl + &quot;feeds/posts/default&quot;' expr:title='data:blog.title + &quot; - Atom&quot;' rel='alternate' type='application/atom+xml'/>
    <link expr:href='data:blog.homepageUrl + &quot;feeds/posts/default?alt=rss&quot;' expr:title='data:blog.title + &quot; - RSS&quot;' rel='alternate' type='application/rss+xml'/>
    <link expr:href='&quot;//www.blogger.com/feeds/&quot; + data:blog.blogId + &quot;/posts/default&quot;' expr:title='data:blog.title + &quot; - Atom&quot;' rel='alternate' type='application/atom+xml'/>
    <link href='//www.blogger.com/openid-server.g' rel='openid.server'/>
    <link expr:href='data:blog.homepageUrl' rel='openid.delegate'/>
    <link crossorigin='anonymous' href='https://maxcdn.bootstrapcdn.com/bootstrap/3.3.6/css/bootstrap.min.css' integrity='sha384-1q8mTJOASx8j1Au+a5WDVnPi2lkFfwwEAa8hDDdjZlpLegxhjVME1fgjWPGmkzs7' rel='stylesheet'/>
    <!-- Facebook Open Graph -->
    <b:if cond='data:blog.pageType == &quot;item&quot;'>
    <meta expr:content='data:blog.pageName' property='og:title'/>
    <meta expr:content='data:blog.canonicalUrl' property='og:url'/>
    <meta content='article' property='og:type'/>
    </b:if>
    <meta expr:content='data:blog.title' property='og:site_name'/>
    <b:if cond='data:blog.url == data:blog.homepageUrl'>
    <meta expr:content='data:blog.metaDescription' name='description'/>
    <meta expr:content='data:blog.title' property='og:title'/>
    <meta content='website' property='og:type'/>
    <b:if cond='data:blog.metaDescription'>
    <meta expr:content='data:blog.metaDescription' property='og:description'/>
    <b:else/>
    <meta expr:content='&quot;Please visit &quot; + data:blog.pageTitle + &quot;for watch and download anime.&quot;' property='og:description'/>
    </b:if>
    </b:if>
    <b:if cond='data:blog.postImageUrl'>
    <meta expr:content='data:blog.postImageUrl' property='og:image'/>
    <b:else/>
    <b:if cond='data:blog.postImageThumbnailUrl'>
    <meta expr:content='data:blog.postThumbnailUrl' property='og:image'/>
    <b:else/>
    <meta content='https://blogger.googleusercontent.com/img/b/R29vZ2xl/AVvXsEgs04331aOCnqTguffC4iKHmdQPrJ2d0Ao0cnH5FK8jYKPfQ1OBTwvbRy5uvG_G_r4NPHflemH_29_6xBi_tC6YVLQzblozJU-MciwJAGv6A_FI-ivW_rYtglF7tkMzo24hqVY7MZr5BWY/s400/no-thumbnail.jpg' property='og:image'/>
    </b:if>
    </b:if>
    <meta content='XXXXXX' name='Author'/>
    <meta expr:content='data:blog.title' name='twitter:site'/>
    <meta content='summary_large_image' name='twitter:card'/>
    <meta content='@XXXXXX' name='twitter:creator'/>
  2. Replace the above code with this code
    <!--[if lt IE 9]>
    <script src="http://html5shiv.googlecode.com/svn/trunk/html5.js"> </script>
    <![endif]-->
    <meta content='IE=edge,chrome=1' http-equiv='X-UA-Compatible'/>
    <b:include data='blog' name='all-head-content'/>
    <meta content='XXXXXX' name='Author'/>
    <!-- Title Blogger -->
    <b:if cond='data:blog.pageType in {&quot;index&quot;} and data:blog.homepageUrl == data:blog.url'><title><data:blog.pageTitle/></title><b:else/>
    <b:if cond='data:blog.pageType in {&quot;item&quot;,&quot;static_page&quot;}'><title><data:blog.pageName/> - <data:blog.title/></title><b:else/>
    <b:if cond='data:blog.pageType in {&quot;index&quot;} and data:blog.pageName == &quot;&quot;'><title>All Posts - <data:blog.title/></title><b:else/>
    <b:if cond='data:blog.pageType in {&quot;error_page&quot;}'><title>Page Not Found - <data:blog.title/></title><b:else/><title><data:blog.pageName/></title></b:if></b:if></b:if></b:if>
    <!-- Meta Keyword -->
    <b:if cond='data:blog.pageType in {&quot;index&quot;} and data:blog.homepageUrl == data:blog.url'><meta content='XXXXXX' name='keywords'/></b:if>
    <b:if cond='data:blog.pageType in {&quot;item&quot;,&quot;static_page&quot;}'><meta expr:content='data:blog.pageName' name='keywords'/></b:if>
    <!-- Noindex -->
    <b:if cond='data:blog.pageType in {&quot;archive&quot;} or data:blog.searchLabel or data:blog.searchQuery'><meta content='noindex,nofollow' name='robots'/></b:if>
    <!-- Facebook Open Graph Tag -->
    <b:if cond='data:blog.pageType == &quot;item&quot;'>
    <meta expr:content='data:blog.pageName' property='og:title'/>
    <meta content='article' property='og:type'/>
    <b:else/>
    <meta expr:content='data:blog.pageTitle' property='og:title'/>
    <meta content='website' property='og:type'/>
    </b:if>
    <b:if cond='data:blog.postImageUrl'>
    <meta expr:content='data:blog.postImageUrl' property='og:image'/>
    <b:else/>
    <b:if cond='data:blog.postImageThumbnailUrl'>
    <meta expr:content='data:blog.postThumbnailUrl' property='og:image'/>
    <b:else/>
    <meta content='https://blogger.googleusercontent.com/img/b/R29vZ2xl/AVvXsEiRgc4HOGmrg6XifhpXyGvunXfKDTXGMwOqbU8caXmYKxuf_6DMsOefIAGzKExG23Tlr5wjgBQdDx3v82iArj0aUAJ1lH9TqSv0L1BaVJ3HIt4kT15fzH93ZQosXk9FUy_0hfXuAtxSAbW-/s1600/no-image.png' property='og:image'/>
    </b:if>
    </b:if>
    <b:if cond='data:blog.metaDescription'>
    <meta expr:content='data:blog.metaDescription' property='og:description'/>
    <b:else/>
    <meta expr:content='&quot;Please visit &quot; + data:blog.pageTitle + &quot; for watch and download anime.&quot;' property='og:description'/>
    </b:if>
    <meta expr:content='data:blog.title' property='og:site_name'/>
    <meta content='en_US' property='og:locale'/>
    <meta content='en_GB' property='og:locale:alternate'/>
    <meta content='id_ID' property='og:locale:alternate'/>
    <meta content='summary' name='twitter:card'/>
    <meta expr:content='data:blog.pageTitle' name='twitter:title'/>
    <meta content='XXXXXX' name='twitter:site'/>
    <meta content='XXXXXX' name='twitter:creator'/>
    <link crossorigin='anonymous' href='https://maxcdn.bootstrapcdn.com/bootstrap/3.3.6/css/bootstrap.min.css' integrity='sha384-1q8mTJOASx8j1Au+a5WDVnPi2lkFfwwEAa8hDDdjZlpLegxhjVME1fgjWPGmkzs7' rel='stylesheet'/>
  3. Then Save Template
Change this
<meta content='XXXXXX' name='Author'/>
.....
<meta expr:content='&quot;Please visit &quot; + data:blog.pageTitle + &quot; for watch and download anime.&quot;' property='og:description'/>
.....
<b:if cond='data:blog.pageType in {&quot;index&quot;} and data:blog.homepageUrl == data:blog.url'><meta content='XXXXXX' name='keywords'/></b:if>
....
<meta content='XXXXXX' name='twitter:site'/>
<meta content='XXXXXX' name='twitter:creator'/>

NOTE : This applies in my bootstrap template, such as Fanstrap, Fanbase v2, Ryotaku v2, and Sakura v2. for template Sparkling, Simple Fast. Please remove external links bootstrap
Update Meta Tag Bootstrap Template karena ada yang tanya templateku (mulai dari fanstrap serta keturunannya) kurang joss seonya. maka saya putuskan bukan ikut meta tag yang lama yang saya ambil dari template mas sugeng dengan sedikit modifikasi dari saya, untuk yang sedang menggunakan template saya silahkan ikuti tutorial dibawah ini untuk mengganti meta tagnya. moga trafiknya naik hehehe.

  1. Pergi ke Blogger > Blogmu > Edit HTML > Cari kode HTML <head> (CTRL + F).
    <!-- Meta Tag -->
    <meta charset='utf-8'/>
    <meta content='width=device-width, initial-scale=1' name='viewport'/>
    <meta content='IE=edge' http-equiv='X-UA-Compatible'/>
    <b:if cond='data:blog.pageType == &quot;index&quot;'>
    <title><data:blog.pageTitle/></title>
    <b:else/>
    <b:if cond='data:blog.pageType == &quot;error_page&quot;'>
    <title>404: Page Not Found | <data:blog.title/></title>
    <b:else/>
    <title><data:blog.pageName/></title>
    </b:if>
    </b:if>
    <meta content='text/html; charset=UTF-8' http-equiv='Content-Type'/>
    <script type='text/javascript'>
    //<![CDATA[
    (function() { (function(){function c(a){this.t={};this.tick=function(a,c,b){var d=void 0!=b?b:(new Date).getTime();this.t[a]=[d,c];if(void 0==b)try{window.console.timeStamp("CSI/"+a)}catch(e){}};this.tick("start",null,a)}var a;window.performance&&(a=window.performance.timing);var h=a?new c(a.responseStart):new c;window.jstiming={Timer:c,load:h};if(a){var b=a.navigationStart,e=a.responseStart;0<b&&e>=b&&(window.jstiming.srt=e-b)}if(a){var d=window.jstiming.load;0<b&&e>=b&&(d.tick("_wtsrt",void 0,b),d.tick("wtsrt_",
    "_wtsrt",e),d.tick("tbsd_","wtsrt_"))}try{a=null,window.chrome&&window.chrome.csi&&(a=Math.floor(window.chrome.csi().pageT),d&&0<b&&(d.tick("_tbnd",void 0,window.chrome.csi().startE),d.tick("tbnd_","_tbnd",b))),null==a&&window.gtbExternal&&(a=window.gtbExternal.pageT()),null==a&&window.external&&(a=window.external.pageT,d&&0<b&&(d.tick("_tbnd",void 0,window.external.startE),d.tick("tbnd_","_tbnd",b))),a&&(window.jstiming.pt=a)}catch(k){}})();window.tickAboveFold=function(c){var a=0;if(c.offsetParent){do a+=c.offsetTop;while(c=c.offsetParent)}c=a;750>=c&&window.jstiming.load.tick("aft")};var f=!1;function g(){f||(f=!0,window.jstiming.load.tick("firstScrollTime"))}window.addEventListener?window.addEventListener("scroll",g,!1):window.attachEvent("onscroll",g);
    })();
    //]]>
    </script>
    <meta content='blogger' name='generator'/>
    <link expr:href='data:blog.homepageUrl + &quot;favicon.ico&quot;' rel='icon' type='image/x-icon'/>
    <link expr:href='data:blog.url' rel='canonical'/>
    <link expr:href='data:blog.homepageUrl + &quot;feeds/posts/default&quot;' expr:title='data:blog.title + &quot; - Atom&quot;' rel='alternate' type='application/atom+xml'/>
    <link expr:href='data:blog.homepageUrl + &quot;feeds/posts/default?alt=rss&quot;' expr:title='data:blog.title + &quot; - RSS&quot;' rel='alternate' type='application/rss+xml'/>
    <link expr:href='&quot;//www.blogger.com/feeds/&quot; + data:blog.blogId + &quot;/posts/default&quot;' expr:title='data:blog.title + &quot; - Atom&quot;' rel='alternate' type='application/atom+xml'/>
    <link href='//www.blogger.com/openid-server.g' rel='openid.server'/>
    <link expr:href='data:blog.homepageUrl' rel='openid.delegate'/>
    <link crossorigin='anonymous' href='https://maxcdn.bootstrapcdn.com/bootstrap/3.3.6/css/bootstrap.min.css' integrity='sha384-1q8mTJOASx8j1Au+a5WDVnPi2lkFfwwEAa8hDDdjZlpLegxhjVME1fgjWPGmkzs7' rel='stylesheet'/>
    <!-- Facebook Open Graph -->
    <b:if cond='data:blog.pageType == &quot;item&quot;'>
    <meta expr:content='data:blog.pageName' property='og:title'/>
    <meta expr:content='data:blog.canonicalUrl' property='og:url'/>
    <meta content='article' property='og:type'/>
    </b:if>
    <meta expr:content='data:blog.title' property='og:site_name'/>
    <b:if cond='data:blog.url == data:blog.homepageUrl'>
    <meta expr:content='data:blog.metaDescription' name='description'/>
    <meta expr:content='data:blog.title' property='og:title'/>
    <meta content='website' property='og:type'/>
    <b:if cond='data:blog.metaDescription'>
    <meta expr:content='data:blog.metaDescription' property='og:description'/>
    <b:else/>
    <meta expr:content='&quot;Please visit &quot; + data:blog.pageTitle + &quot;for watch and download anime.&quot;' property='og:description'/>
    </b:if>
    </b:if>
    <b:if cond='data:blog.postImageUrl'>
    <meta expr:content='data:blog.postImageUrl' property='og:image'/>
    <b:else/>
    <b:if cond='data:blog.postImageThumbnailUrl'>
    <meta expr:content='data:blog.postThumbnailUrl' property='og:image'/>
    <b:else/>
    <meta content='https://blogger.googleusercontent.com/img/b/R29vZ2xl/AVvXsEgs04331aOCnqTguffC4iKHmdQPrJ2d0Ao0cnH5FK8jYKPfQ1OBTwvbRy5uvG_G_r4NPHflemH_29_6xBi_tC6YVLQzblozJU-MciwJAGv6A_FI-ivW_rYtglF7tkMzo24hqVY7MZr5BWY/s400/no-thumbnail.jpg' property='og:image'/>
    </b:if>
    </b:if>
    <meta content='XXXXXX' name='Author'/>
    <meta expr:content='data:blog.title' name='twitter:site'/>
    <meta content='summary_large_image' name='twitter:card'/>
    <meta content='@XXXXXX' name='twitter:creator'/>
  2. Ganti kode diatas dengan kode dibawah ini
    <!--[if lt IE 9]>
    <script src="http://html5shiv.googlecode.com/svn/trunk/html5.js"> </script>
    <![endif]-->
    <meta content='IE=edge,chrome=1' http-equiv='X-UA-Compatible'/>
    <b:include data='blog' name='all-head-content'/>
    <meta content='XXXXXX' name='Author'/>
    <!-- Title Blogger -->
    <b:if cond='data:blog.pageType in {&quot;index&quot;} and data:blog.homepageUrl == data:blog.url'><title><data:blog.pageTitle/></title><b:else/>
    <b:if cond='data:blog.pageType in {&quot;item&quot;,&quot;static_page&quot;}'><title><data:blog.pageName/> - <data:blog.title/></title><b:else/>
    <b:if cond='data:blog.pageType in {&quot;index&quot;} and data:blog.pageName == &quot;&quot;'><title>All Posts - <data:blog.title/></title><b:else/>
    <b:if cond='data:blog.pageType in {&quot;error_page&quot;}'><title>Page Not Found - <data:blog.title/></title><b:else/><title><data:blog.pageName/></title></b:if></b:if></b:if></b:if>
    <!-- Meta Keyword -->
    <b:if cond='data:blog.pageType in {&quot;index&quot;} and data:blog.homepageUrl == data:blog.url'><meta content='XXXXXX' name='keywords'/></b:if>
    <b:if cond='data:blog.pageType in {&quot;item&quot;,&quot;static_page&quot;}'><meta expr:content='data:blog.pageName' name='keywords'/></b:if>
    <!-- Noindex -->
    <b:if cond='data:blog.pageType in {&quot;archive&quot;} or data:blog.searchLabel or data:blog.searchQuery'><meta content='noindex,nofollow' name='robots'/></b:if>
    <!-- Facebook Open Graph Tag -->
    <b:if cond='data:blog.pageType == &quot;item&quot;'>
    <meta expr:content='data:blog.pageName' property='og:title'/>
    <meta content='article' property='og:type'/>
    <b:else/>
    <meta expr:content='data:blog.pageTitle' property='og:title'/>
    <meta content='website' property='og:type'/>
    </b:if>
    <b:if cond='data:blog.postImageUrl'>
    <meta expr:content='data:blog.postImageUrl' property='og:image'/>
    <b:else/>
    <b:if cond='data:blog.postImageThumbnailUrl'>
    <meta expr:content='data:blog.postThumbnailUrl' property='og:image'/>
    <b:else/>
    <meta content='https://blogger.googleusercontent.com/img/b/R29vZ2xl/AVvXsEiRgc4HOGmrg6XifhpXyGvunXfKDTXGMwOqbU8caXmYKxuf_6DMsOefIAGzKExG23Tlr5wjgBQdDx3v82iArj0aUAJ1lH9TqSv0L1BaVJ3HIt4kT15fzH93ZQosXk9FUy_0hfXuAtxSAbW-/s1600/no-image.png' property='og:image'/>
    </b:if>
    </b:if>
    <b:if cond='data:blog.metaDescription'>
    <meta expr:content='data:blog.metaDescription' property='og:description'/>
    <b:else/>
    <meta expr:content='&quot;Please visit &quot; + data:blog.pageTitle + &quot; for watch and download anime.&quot;' property='og:description'/>
    </b:if>
    <meta expr:content='data:blog.title' property='og:site_name'/>
    <meta content='en_US' property='og:locale'/>
    <meta content='en_GB' property='og:locale:alternate'/>
    <meta content='id_ID' property='og:locale:alternate'/>
    <meta content='summary' name='twitter:card'/>
    <meta expr:content='data:blog.pageTitle' name='twitter:title'/>
    <meta content='XXXXXX' name='twitter:site'/>
    <meta content='XXXXXX' name='twitter:creator'/>
    <link crossorigin='anonymous' href='https://maxcdn.bootstrapcdn.com/bootstrap/3.3.6/css/bootstrap.min.css' integrity='sha384-1q8mTJOASx8j1Au+a5WDVnPi2lkFfwwEAa8hDDdjZlpLegxhjVME1fgjWPGmkzs7' rel='stylesheet'/>
  3. lalu Save Template
Silahkan ganti terlebih dahulu kode yg mirip kek dibawah ini ganti XXXX
<meta content='XXXXXX' name='Author'/>
.....
<meta expr:content='&quot;Please visit &quot; + data:blog.pageTitle + &quot; for watch and download anime.&quot;' property='og:description'/>
.....
<b:if cond='data:blog.pageType in {&quot;index&quot;} and data:blog.homepageUrl == data:blog.url'><meta content='XXXXXX' name='keywords'/></b:if>
....
<meta content='XXXXXX' name='twitter:site'/>
<meta content='XXXXXX' name='twitter:creator'/>

NOTE : Ini hanya untuk template bootstrap, seperti Fanstrap v2, Fanbase v2, Ryotaku v2, and Sakura v2. untuk template simple fast dan sparkling silahkan hapus meta tag bootstrap
<link crossorigin='anonymous' href='https://maxcdn.bootstrapcdn.com/bootstrap/3.3.6/css/bootstrap.min.css' integrity='sha384-1q8mTJOASx8j1Au+a5WDVnPi2lkFfwwEAa8hDDdjZlpLegxhjVME1fgjWPGmkzs7' rel='stylesheet'/>


Read More

1 Mei 2016

How to Add a Facebook Comments in Blog

How to Add a Facebook Comments in Blog with defer loading
How to Add a Facebook Comments in Blog - because the template that I created does not use facebook comment box. so I made a tutorial how to add facebook comments were mild with the help setTimeout makes blogs is not heavy. please follow the instructions below.

Adding a Facebook Plugin Comment on the BlogAdding Javascript Facebook
javascript is not only useful on facebook comment, but other facebook plugin like fan page plugin, like button, the share button and more.
  1. Go to Blogger > Yourblog > Template > Edit HTML > Find <body (CTRL + F in editor)
  2. Add the code below after html <body
    <div id="fb-root"></div>
    <script type='text/javascript'>//<![CDATA[
    setTimeout( function () {
    (function(d, s, id) {
    var js, fjs = d.getElementsByTagName(s)[0];
    if (d.getElementById(id)) return;
    js = d.createElement(s); js.id = id;
    js.src = "//connect.facebook.net/en_US/sdk.js#xfbml=1&version=v2.0";
    fjs.parentNode.insertBefore(js, fjs);
    }(document, 'script', 'facebook-jssdk'));
    }, 2000);
    //]]></script>
  3. Then Save Template
NB : If this code already exists please replace the above code so that fast blog

Adding HTML Facebook Comments
  1. Go to Blogger > Yourblog > Template > Edit HTML > Find <b:include data='post' name='threaded_comments'/> (CTRL + F in editor)
  2. You will find 2 html the same as below
    <b:if cond='data:blog.pageType == "static_page"'>
    <b:include data='post' name='threaded_comments'/>
    </b:if>
    <b:if cond='data:blog.pageType == "item"'>
    <b:include data='post' name='threaded_comments'/>
    </b:if>
  3. Then Replace with the code below
    <b:if cond='data:blog.pageType == "item"'>
    <div id='fb-comments'><div class="fb-comments" expr:data-href="data:post.url" data-numposts="5"></div><div class='clear'/></div>
    <b:include data='post' name='threaded_comments'/>
    </b:if>
    <b:if cond='data:blog.pageType == "static_page"'>
    <div id='fb-comments'><div class="fb-comments" expr:data-href="data:post.url" data-numposts="5"></div><div class='clear'/></div>
    <b:include data='post' name='threaded_comments'/>
    </b:if>
  4. Save Template
Adding CSS Facebook Comments
because facebook comment unresponsive, then you need to add this css and also add spacing between the facebook comments and the comments box blogger.
  1. Go to Blogger > Yourblog > Template > Edit HTML > Find */]]></b:skin> or </style>(CTRL + F in editor)
  2. Add css below after html */]]></b:skin> or </style>
    #fb-comments{display:block;margin:15px auto;}
    .fb_iframe_widget,.fb_iframe_widget span,.fb_iframe_widget span iframe[style]{min-width:100%!important;width:100%!important}
  3. Then Save Template
Source Script Facebook : http://stackoverflow.com/questions/15349867/defer-loading-of-facebook-like-button-script
Cara menambahkan kotak komentar facebook di blog - karena template yang saya buat tidak menggunakan kotak komentar facebook. maka dari itu saya membuatkan tutorial cara menambahkan kotak komentar dengan bantuan "setTimetout" yaitu biar blog tetap ringan. bagi yang ingin membuatnya silahkan ikuti tutorial dibawah ini.

Menambahkan Plugin Kotak Komentar Facebook di BlogMenambahkan Javascript Facebook
javascript ini bukan hanya berguna pada kotak komentar facebook, tetapi plugin facebook lainnya seperti, tombol suka, tombol share, dan lainnya.
  1. Pergi ke Blogger > Blogmu > Template > Edit HTML > Cari Kode <body (CTRL + F pada saat di editor)
  2. Tambahkan kode dibawah ini sesudah kode <body
    <div id="fb-root"></div>
    <script type='text/javascript'>//<![CDATA[
    setTimeout( function () {
    (function(d, s, id) {
    var js, fjs = d.getElementsByTagName(s)[0];
    if (d.getElementById(id)) return;
    js = d.createElement(s); js.id = id;
    js.src = "//connect.facebook.net/en_US/sdk.js#xfbml=1&version=v2.0";
    fjs.parentNode.insertBefore(js, fjs);
    }(document, 'script', 'facebook-jssdk'));
    }, 2000);
    //]]></script>
  3. Lalu Save Template
NB : bagi yang sudah punya kode yang mirip seperti diatas saya sarankan ganti kode yang ada di blog mu dengan kode diatas ini.

Menambahkan HTML Kotak Komentar Facebook
  1. Pergi ke Blogger > Blogmu > Template > Edit HTML > Cari kode <b:include data='post' name='threaded_comments'/> (CTRL + F pada saat di editormu)
  2. Kamu akan melihat 2 kode yang sama seperti contoh dibawah ini
    <b:if cond='data:blog.pageType == "static_page"'>
    <b:include data='post' name='threaded_comments'/>
    </b:if>
    <b:if cond='data:blog.pageType == "item"'>
    <b:include data='post' name='threaded_comments'/>
    </b:if>
  3. kalau udah ketemu silahkan ganti sama kode dibawah ini
    <b:if cond='data:blog.pageType == "item"'>
    <div id='fb-comments'><div class="fb-comments" expr:data-href="data:post.url" data-numposts="5"></div><div class='clear'/></div>
    <b:include data='post' name='threaded_comments'/>
    </b:if>
    <b:if cond='data:blog.pageType == "static_page"'>
    <div id='fb-comments'><div class="fb-comments" expr:data-href="data:post.url" data-numposts="5"></div><div class='clear'/></div>
    <b:include data='post' name='threaded_comments'/>
    </b:if>
  4. Lalu Save Template
Menambahkan CSS Kotak Komentar Facebook
karena kotak komentar facebook tidak responsive, maka kamu harus menambahkan kode css dibawah ini dan juga membuat jarak bagi kotak komentar facebook dan kotak komentar google.
  1. Pergi ke blogger > Blogmu > Template > Edit HTML > Cari kode */]]></b:skin> atau </style>(CTRL + F pada saat di blog)
  2. Tambahkan css dibawah ini sebelum kode */]]></b:skin> atau </style>
    #fb-comments{display:block;margin:15px auto;}
    .fb_iframe_widget,.fb_iframe_widget span,.fb_iframe_widget span iframe[style]{min-width:100%!important;width:100%!important}
  3. Lalu Klik Save Template
Source Script Facebook : http://stackoverflow.com/questions/15349867/defer-loading-of-facebook-like-button-script

Read More

28 Apr 2016

How to add Bootstrap to Blogger

How to add bootstrap 3.0 to blogger
How to add Framework Twitter Bootstrap to Blogger - yesterday i already share How to add a progess in blog, today i will share how to add framework twitter bootstrap 3 in blogspot.

Bootstrap is the most popular HTML, CSS, and JavaScript framework for developing responsive, mobile-first web sites.

My template also now using bootstrap 3.0 to create a responsive and full-featured blog provided from bootstrap like jumbotron, wells, progress, alerts, pager, pagination, etc.

What is Bootstrap?
  1. Bootstrap is a free front-end framework for faster and easier web development
  2. Bootstrap includes HTML and CSS based design templates for typography, forms, buttons, tables, navigation, modals, image carousels and many other, as well as optional JavaScript plugins
  3. Bootstrap also gives you the ability to easily create responsive designs
How to add Bootstrap in blog?We will use the CDN (Content Delivery Network) of MaxCDN which provide support for Bootstrap.
Note : If you use a template that I design, then you do not need to follow this tutorial, Because my template already use bootstraps

Add a Bootstrap CSS in Blog
  1. Go to Blogger > Yourblog > Template > Edit HTML > Find <head> (CTRL + F in editor)
  2. Put the code below before <head>
    <!-- Latest compiled and minified CSS -->
    <link rel="stylesheet" href="http://maxcdn.bootstrapcdn.com/bootstrap/3.3.6/css/bootstrap.min.css"/>
    <!-- If the viewport meta tag already exists in your blog, then you should replace it with below -->
    <meta name="viewport" content="width=device-width, initial-scale=1"/>
  3. Save Template
Add a Bootstrap Javascript in Blog
If you want to make javascript drop down menus, tabs, scrollspy, collapse button (button spoiler), carousel, pop up alerts, button effect. then you should add this javascript. but if just want to create a responsive blog you do not need to add this javascript.
  1. Go to Blogger > Yourblog > Template > Edit HTML > Find </head> (CTRL + F in editor)
  2. Put the code below before </head>
    <!-- jQuery library (Optional - if your blog have jquery dont copy this) -->
    <script src="https://ajax.googleapis.com/ajax/libs/jquery/1.12.0/jquery.min.js"></script>
    <!-- Latest compiled JavaScript -->
    <script src="http://maxcdn.bootstrapcdn.com/bootstrap/3.3.6/js/bootstrap.min.js"></script>
  3. Save Template
Now your blog have a bootstrap 3, for component, css, javascript you can visit the blog Bootstrap

Add a Bootstrap Container in Blog
  1. Go to Blogger > Yourblog > Template > Edit HTML > Find <div id='outer-wrapper'> (CTRL + F in editor)
  2. Then add class='container' in <div id='outer-wrapper'>
    <div class='container' id='outer-wrapper'>
  3. Save Template
Add a Bootstrap Grid in Blog
Bootstrap's grid system allows up to 12 columns across the page.
If you do not want to use all 12 column individually, you can group the columns together to create wider columns:
  1. Go to Blogger > Yourblog > Template > Edit HTML > Find <div id='main-wrapper'>
    (CTRL + F in editor)
    If it does not find HTML <div id='main-wrapper'>
    Please find this
    <div id='main-wrapper' itemscope='itemscope' itemtype='http://schema.org/Blog' role='main'>
  2. then replace with this html
    <div class='col-xs-12 col-sm-8 col-md-8 clearfix' id='main-wrapper' itemscope='itemscope' itemtype='http://schema.org/Blog' role='main'>
  3. Find <div id='sidebar-wrapper'> (CTRL + F in editor)
    If it does not find HTML <div id='sidebar-wrapper'>
    Please find this
    <div id='sidebar-wrapper' itemprop='mainEntity' itemscope='itemscope' itemtype='http://schema.org/WPSideBar' role='complementary'>
    or
    <div id='sidebar-wrapper' itemscope='itemscope' itemtype='http://schema.org/WPSideBar'>
  4. Then replace with this
    <div class='col-xs-12 col-sm-4 col-md-4 clearfix' id='sidebar-wrapper' itemprop='mainEntity' itemscope='itemscope' itemtype='http://schema.org/WPSideBar' role='complementary'> 
  5. Find <div id='content-wrapper'> (CTRL + F in editor)
  6. Then replace with this <div class='row' id='content-wrapper'>
  7. Save Template
How to Make Post Gridsometimes i wonder why people liked the Style Post Grid.
If you want make post like grid you can follow this step
  1. Find HTML <div class='blog-posts hfeed'> CTRL + F in editor)
  2. Replace with this <div class='blog-posts hfeed row'>
  3. Find HTML <b:include data='post' name='post'/> (CTRL + F in editor)
  4. Replace with this
    <b:if cond='data:blog.pageType != "static_page"'><b:if cond='data:blog.pageType != "item"'>
    <div class='_grid col-xs-6 col-sm-4 col-md-4'><b:include data='post' name='post'/><div/>
    <b:else/>
    <b:include data='post' name='post'/>
    </b:if></b:if>
  5. Then Save Template
Now your blog is installed bootstrap, but your blog is not yet fully responsive. You have to manage the rest with CSS media queries for selectors who have not been responsive. if you are still confused with the tutorial above, please comment.
thank you
Cara Menambahkan Bootstrap di blogger - kemarin saya sudah share Cara menambahkan progress bar di blog, hari ini saya akan share cara menambahkan bootstrap di blogger.

Bootstrap yaitu kumpulan rangka HTML, CSS, dan Javascript yang paling popular sering digunakan developer untuk membuat blog responsive, dan mobile friendly.

Templateku juga menggunakan bootstrap versi 3 untuk membuat blog responsive dan full fitur yang disediakan bootstrap seperti jumbotron, well, progress, alert, pagination, button, dropdown, navigasi, dan lupa lagi.

Apa itu Bootstrap?
  1. Bootstrap adalah kerangka front-end gratis untuk pengembangan web lebih cepat dan lebih mudah
  2. Bootstrap menyediakan desain HTML dan CSS untuk typography, form, button, tabel, navigasi, pop up, slider dan lainnya
  3. Bootstrap juga memudahkan adnda untuk membuat blog responsif
Bagai mana cara menambahkan Bootstrap di blog?kita akan menggunakan CDN (Content Delivery Network) dari MaxCDN yang sudah disediakan di situs bootstrapnya.
Catatan : Jika kamu menggunakan template yang saya desain, maka kamu tidak perlu ikuti tutorial ini karena template saya sudah menggunakan bootstrap

Menambahkan CSS Bootstrap di blog
  1. Pergi ke Blogger > Blogmu > Template > Edit HTML > Cari kode <head> (CTRL + F di editor)
  2. Taruh kode dibawah ini sesudah kode <head>
    <!-- Latest compiled and minified CSS -->
    <link rel="stylesheet" href="http://maxcdn.bootstrapcdn.com/bootstrap/3.3.6/css/bootstrap.min.css"/>
    <!-- jika meta tag viewport sudah ada di blogmu maka ganti sama kode dibawah ini -->
    <meta name="viewport" content="width=device-width, initial-scale=1"/>
  3. Save Template
Menambahkan Javascript Bootstrap di blog
jika kamu mau membuat navigasi dropdown, tab, scrollspy, tombol spoiler, slider, kotak pop up, kotak info atau kotak peringatanda, dan tombol efek maka kamu harus menambahkan javascript bootstrap di blogmu, namun jika kamu hanya ingin membuat blogmu responsive maka kamu tidak perlu menambahkan javascript ini.
  1. Pergi ke blogger > Blogmu > Template > Edit HTML > Cari kode </head> (CTRL + F in editor)
  2. Put the code below before </head>
    <!-- jQuery library (Opsional - jika blogmu udah ada jquery jangan kocy js script dibawah ini) -->
    <script src="https://ajax.googleapis.com/ajax/libs/jquery/1.12.0/jquery.min.js"></script>
    <!-- Latest compiled JavaScript -->
    <script src="http://maxcdn.bootstrapcdn.com/bootstrap/3.3.6/js/bootstrap.min.js"></script>
  3. Save Template
sekarang blogmu sudah terpasang bootstrap, untuk komponen, css, javascript kamu bisa cek disitus officialnya Bootstrap

Cara Menambahkan Kontainer Bootstrap di blog
  1. Pergi ke Blogger > Blogmu > Template > Edit HTML > Cari kode <div id='outer-wrapper'> (CTRL + F di editor)
  2. lalu tambahkan kode class='container' di <div id='outer-wrapper'> maka hasilnya seperti dibawah ini
    <div class='container' id='outer-wrapper'>
  3. Lalu save template
Membuat Main Wrapper dan Sidebar-Wrapper Responsive
dalam Sistem Grid Bootstrap yaitu hanya memperbolehkan 12 kolom. contohnya
<div class='container' id='content'>
<div class='col-xs-12 col-sm-8 col-md-8' id='main'>
</div>
<div class='col-xs-12 col-sm-4 col-md-4' id='side'>
</div>
</div>
element id='main' dan elemen id='side' harus totalnya berjumlah 12 tidak boleh lewat. 8 + 4 = 12
semoga paham, untuk col-xs-12 yaitu kolom akan 100% pada saat di mobile. silahkan cek di situsnya untuk info lebih lanjut
  1. Pergi ke Blogger > Blogmu > Template > Edit HTML > Cari kode <div id='main-wrapper'>
    (CTRL + F di editor)
    Jika tidak ketemu kode <div id='main-wrapper'>
    Silahkan cari kode ini
    <div id='main-wrapper' itemscope='itemscope' itemtype='http://schema.org/Blog' role='main'>
  2. Jika sudah ketemu lalu ganti dengan html dibawah ini
    <div class='col-xs-12 col-sm-8 col-md-8 clearfix' id='main-wrapper' itemscope='itemscope' itemtype='http://schema.org/Blog' role='main'>
  3. Cari <div id='sidebar-wrapper'> (CTRL + F di editor)
    Jika tidak ketemu kode <div id='sidebar-wrapper'>
    Silahkan cari kode ini
    <div id='sidebar-wrapper' itemprop='mainEntity' itemscope='itemscope' itemtype='http://schema.org/WPSideBar' role='complementary'>
    atau
    <div id='sidebar-wrapper' itemscope='itemscope' itemtype='http://schema.org/WPSideBar'>
  4. Jika sudah ketemu lalu ganti dengan html dibawah ini
    <div class='col-xs-12 col-sm-4 col-md-4 clearfix' id='sidebar-wrapper' itemprop='mainEntity' itemscope='itemscope' itemtype='http://schema.org/WPSideBar' role='complementary'> 
  5. Cari kode <div id='content-wrapper'> (CTRL + F di editor)
  6. jika ketmeu kode diatas lalu ganti denga kode dibawah ini <div class='row' id='content-wrapper'>
  7. Save Template
Membuat Post Bergaya Grid dengan Bantuan Bootstrapterkadang saya sering bingung mengapa orang lebih suka template bergaya "Grid".
bagi yang ingin membuat post bergaya grid silahkan ikut tutorial dibawah ini
  1. Cari kode HTML <div class='blog-posts hfeed'> CTRL + F in editor)
  2. Lalu ganti dengan kode ini <div class='blog-posts hfeed row'>
  3. Cari kode HTML <b:include data='post' name='post'/> (CTRL + F in editor)
  4. Lalu ganti dengan kode ini
    <b:if cond='data:blog.pageType != "static_page"'><b:if cond='data:blog.pageType != "item"'>
    <div class='_grid col-xs-6 col-sm-4 col-md-4'><b:include data='post' name='post'/><div/>
    <b:else/>
    <b:include data='post' name='post'/>
    </b:if></b:if>
  5. Terus Save Template
Blogmu sudah terpasang bootstrap berserta cincongnya, namun blogmu belum sepenuhnya responsif, kamu harus mengatur css untuk seletor yang kamu buat/tidak ada dibootstrap dengan menggunakan CSS Media Queries bisa cari digugel tuh infonya, jika masih bingung cincong diatas silahkan fatok the snake di komentar.
terima kasih

Read More

23 Apr 2016

How to add a Progress Bar for Blog

Cover How To Make Progress Bar
How to add a Progress Bar for Blog - before i share template One Stream Blogger Template, today i want share how to make Progress Bar Simple with CSS and HTML for fansub or fanshare or other ._.
Add CSS Proggress Bar
  1. Go To Blogger > Yourblog > Template > Edit HTML
  2. Copy this css and put before ]]></b:skin> or </style>
    /* Progress Bar Full */
    .fx:after,.sidebar .widget:after{content:"";display:table;clear:both}
    .fprogress b{text-transform:uppercase;font-size:14px;margin-bottom:2px;display:block}
    .fbar{width:100%;background:#F5F5F5;border:1px solid #ddd;height:25px;display:block;border-radius:3px;text-align:center;position:relative}
    .fbar span{display:block;height:100%;background:#428BCA;position:relative}
    .fbar span:after{content:attr(data-percent);color:#fff;text-align:center;position:absolute;left:0;right:0;top:0}
    /* Progress Bar Box */
    .fbar-box{padding:2px;border-radius:20px;}
    .fbar-box span{border-radius:20px}
    .fbar-box span:after{top:-2px;font-size:13px}
    /* Progress Bar Radius */
    .fbar-radius{width:130px;height:130px;border-radius:100%;overflow:hidden;border:0;}
    .fbar-radius:after{color:#428BCA;top:33%;font-size:30px;content:attr(data-percent);z-index:30;position:absolute;left:0;right:0}
    .fbar-radius span{display:block}
    .fbar-radius:before{content:"";background:#FFF;width:105px;height:105px;position:absolute;left:13px;top:13px;border-radius:100%;z-index:10}
    /* Progress Bar Tooltip 1 */
    .fbar-tip:hover span:after{opacity:1}
    .fbar-tip span:after{background:#333;top:-100%;right:0;left:inherit;width:40px;border-radius:3px;font-size:12px;opacity:0;transition:all .7s ease-in-out}
    /* Progress Bar Tooltip 2 */
    .fbar-atip span:after{background:#333;top:-120%;right:0;left:inherit;width:40px;border-radius:3px;font-size:12px}
    .fbar-atip span:before{content:"";position:absolute;border:5px solid transparent;border-top-color:#333;right:15px;top:-7px}
  3. Save Template
Add Widget Progress Bar
  1. Go To Blogger > Yourblog > Layout > Add a Gadget > HTML/Javascript
  2. Choose Style Progress Bar
    Progress Bar Full

    <div class='fprogress fx'>
    <b>Progress Bar One</b>
    <div class='fbar fbar-full'><span style='width:50%' data-percent='50%'></span></div>
    <b>Progress Bar Two</b>
    <div class='fbar fbar-full'><span style='width:50%' data-percent='50%'></span></div>
    </div>
    Progress Bar Boxed

    <div class='fprogress fx'>
    <b>Progress Bar One</b>
    <div class='fbar fbar-box'><span style='width:50%' data-percent='50%'></span></div>
    <b>Progress Bar Two</b>
    <div class='fbar fbar-box'><span style='width:50%' data-percent='50%'></span></div>
    </div>
    Progress Tooltip 1

    <div class='fprogress fx'>
    <b>Progress Bar One</b>
    <div class='fbar fbar-tip'><span style='width:50%' data-percent='50%'></span></div>
    <b>Progress Bar Two</b>
    <div class='fbar fbar-tip'><span style='width:50%' data-percent='50%'></span></div>
    </div>
    Progress Tooltip 2

    <div class='fprogress fx'>
    <b>Progress Bar One</b>
    <div class='fbar fbar-atip'><span style='width:50%' data-percent='50%'></span></div>
    <b>Progress Bar Two</b>
    <div class='fbar fbar-atip'><span style='width:50%' data-percent='50%'></span></div>
    </div>
    Progress Radius

    <div class='fprogress fx'>
    <b>Progress Bar One</b>
    <div class='fbar fbar-radius' data-percent='50%'><span style='width:50%'></span></div>
    <b>Progress Bar Two</b>
    <div class='fbar fbar-radius' data-percent='50%'><span style='width:50%'></span></div>
    </div>
  3. Then Save
Cara Menambahkan Progress Bar di blog - sebelumnya saya sudah share template One Stream Blogger Template, hari ini saya ingin share cara membuat progress bar simple dengan css dan html untuk fansub atau fanshare. biasanya progress bar sangat berguna bagi fansub untuk menunjukan status garapan anime yang sedang dikerjakan.

Menambahkan CSS Progress Bar
  1. Masuk ke blogger > Blogmu > Template > Edit HTML
  2. Copy css dibawah ini sebelum kode ]]></b:skin> atau </style>
    /* Progress Bar Full */
    .fx:after,.sidebar .widget:after{content:"";display:table;clear:both}
    .fprogress b{text-transform:uppercase;font-size:14px;margin-bottom:2px;display:block}
    .fbar{width:100%;background:#F5F5F5;border:1px solid #ddd;height:25px;display:block;border-radius:3px;text-align:center;position:relative}
    .fbar span{display:block;height:100%;background:#428BCA;position:relative}
    .fbar span:after{content:attr(data-percent);color:#fff;text-align:center;position:absolute;left:0;right:0;top:0}
    /* Progress Bar Box */
    .fbar-box{padding:2px;border-radius:20px;}
    .fbar-box span{border-radius:20px}
    .fbar-box span:after{top:-2px;font-size:13px}
    /* Progress Bar Radius */
    .fbar-radius{width:130px;height:130px;border-radius:100%;overflow:hidden;border:0;}
    .fbar-radius:after{color:#428BCA;top:33%;font-size:30px;content:attr(data-percent);z-index:30;position:absolute;left:0;right:0}
    .fbar-radius span{display:block}
    .fbar-radius:before{content:"";background:#FFF;width:105px;height:105px;position:absolute;left:13px;top:13px;border-radius:100%;z-index:10}
    /* Progress Bar Tooltip 1 */
    .fbar-tip:hover span:after{opacity:1}
    .fbar-tip span:after{background:#333;top:-100%;right:0;left:inherit;width:40px;border-radius:3px;font-size:12px;opacity:0;transition:all .7s ease-in-out}
    /* Progress Bar Tooltip 2 */
    .fbar-atip span:after{background:#333;top:-120%;right:0;left:inherit;width:40px;border-radius:3px;font-size:12px}
    .fbar-atip span:before{content:"";position:absolute;border:5px solid transparent;border-top-color:#333;right:15px;top:-7px}
  3. Save Template
Menambahkan Progress Bar di Widget
karena tutor diatas masih cssnya sekarang tinggal memunculkan progress barnya di widget
  1. Pergi ke Blogger > Blogmu > Layout > Add a Gadget > HTML/Javascript
  2. Pilih gaya progres bar yang kamu sukai
    Progress Bar Penuh

    <div class='fprogress fx'>
    <b>Progress Bar One</b>
    <div class='fbar fbar-full'><span style='width:50%' data-percent='50%'></span></div>
    <b>Progress Bar Two</b>
    <div class='fbar fbar-full'><span style='width:50%' data-percent='50%'></span></div>
    </div>
    Progress Bar Melengkung

    <div class='fprogress fx'>
    <b>Progress Bar One</b>
    <div class='fbar fbar-box'><span style='width:50%' data-percent='50%'></span></div>
    <b>Progress Bar Two</b>
    <div class='fbar fbar-box'><span style='width:50%' data-percent='50%'></span></div>
    </div>
    Progress Tooltip 1

    <div class='fprogress fx'>
    <b>Progress Bar One</b>
    <div class='fbar fbar-tip'><span style='width:50%' data-percent='50%'></span></div>
    <b>Progress Bar Two</b>
    <div class='fbar fbar-tip'><span style='width:50%' data-percent='50%'></span></div>
    </div>
    Progress Tooltip 2

    <div class='fprogress fx'>
    <b>Progress Bar One</b>
    <div class='fbar fbar-atip'><span style='width:50%' data-percent='50%'></span></div>
    <b>Progress Bar Two</b>
    <div class='fbar fbar-atip'><span style='width:50%' data-percent='50%'></span></div>
    </div>
    Progress Radius

    <div class='fprogress fx'>
    <b>Progress Bar One</b>
    <div class='fbar fbar-radius' data-percent='50%'><span style='width:50%'></span></div>
    <b>Progress Bar Two</b>
    <div class='fbar fbar-radius' data-percent='50%'><span style='width:50%'></span></div>
    </div>
  3. Lalu Save Template


Read More

20 Apr 2016

OneStream Streaming Blogger Template v1.3

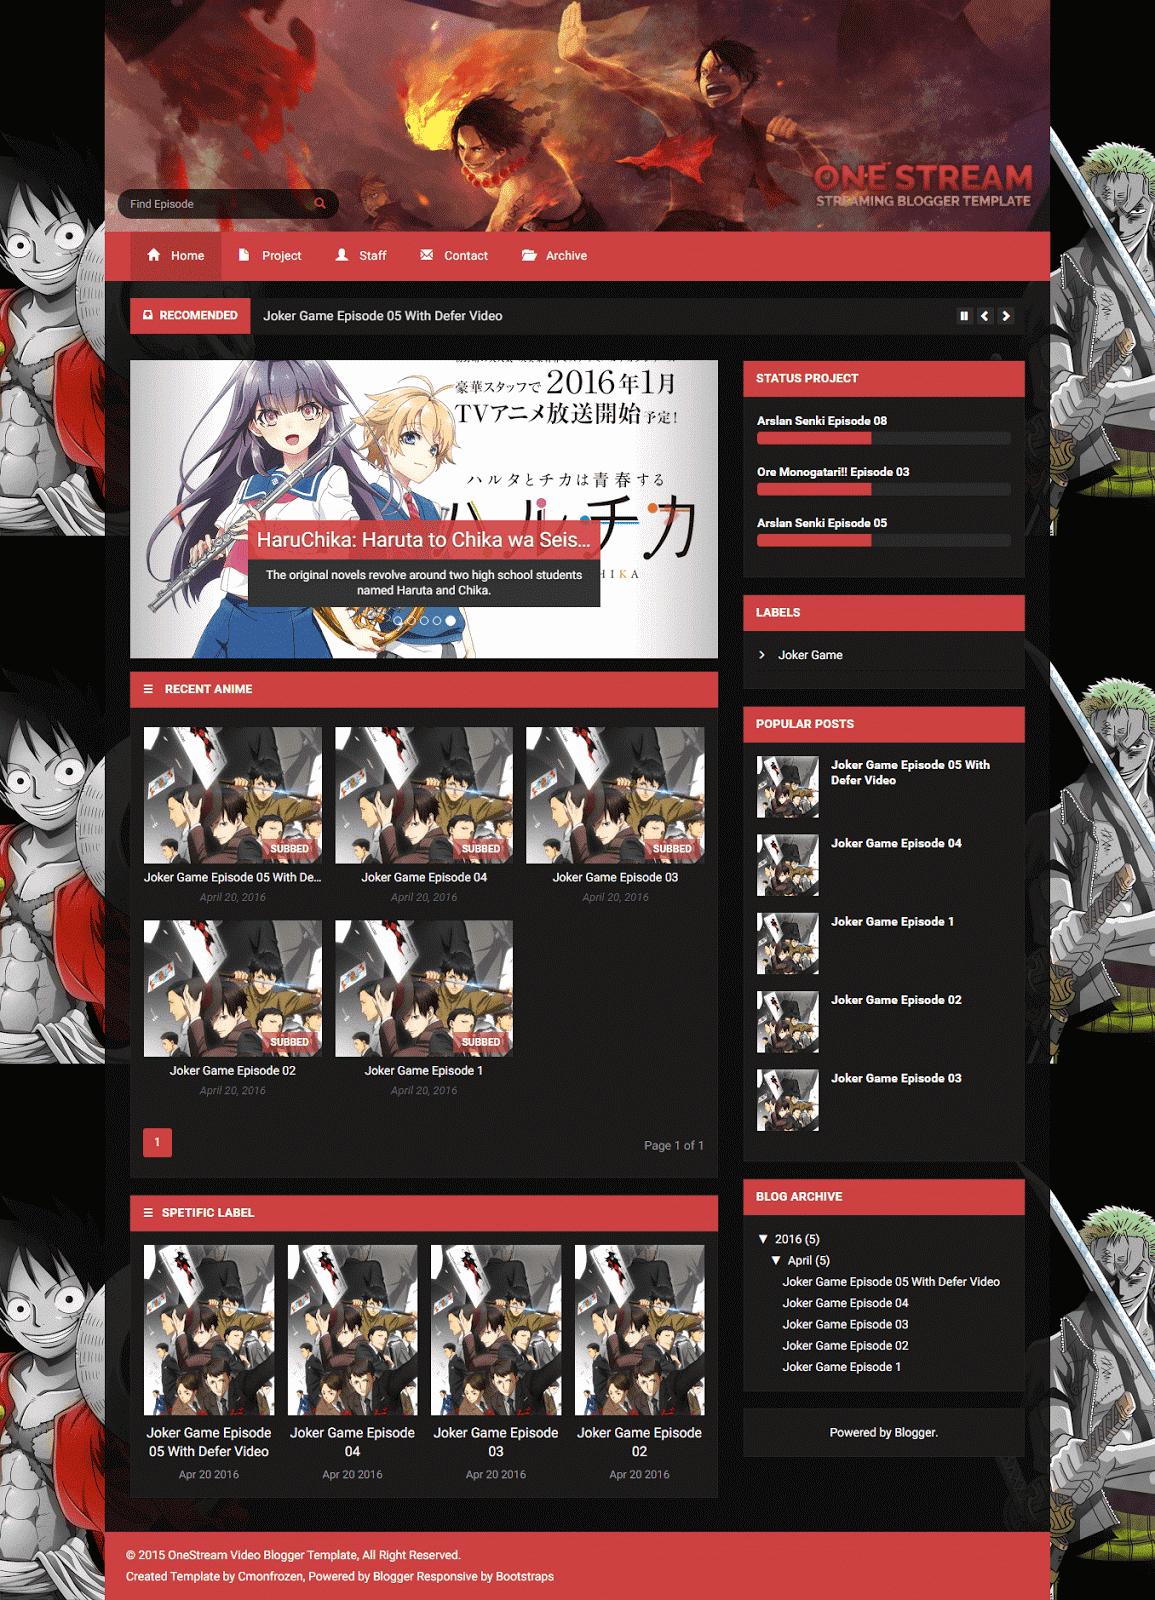
OneStream Streaming Blogger Template - is streaming the first template I created, I was challenged to design a dark color. because I see the design of streaming anime is dark. made me think hard to make designs with dark and the results are quite impressive to behold :D
Thank you for misscelles-d4p7e2i and ferdiferrah-d4lv08g for image one piece make my design is awesome :D
Cover Streaming Anime Blogger Template
Preview OneStreaming Anime Video Blogger Template
Description Template

OneStream Video Blogger Template is a template for Video, Movies, and Streaming anime with Newsticker, Carousel Slider and Spetific label, Defer Video for optimize loading blog, Searchbox, Turn off light in the post, Download button with spoiler/collapse and more important this template support RTL Blog.

This template is responsive, 2 column and colored dark and red with awesome features have well documented and PSD Header.

Note : Click Button "How To Configure Template" for setting this template
Change Thumbnail Post : Add HTML Image into iframe <iframe><img src="" alt="" title=""/></iframe> < example Add Thumbnail Post
from folder Document One Stream Blogger Template > Post - Streaming.txt

Log : Update v1.3 [5/7/16]

Documents (Only) Template (Only) Live Preview How to Configure Template
  • PSD Header
  • Responsive
  • Bootstrap
  • 2 Column
  • Spetific Label
  • Turn Off Light
  • Pagination
  • Search Box
  • Newsticker
  • Carousel Slider
  • Related Posts
  • Tab Video Mirror
  • Popup Report Video
  • Download Button Collapse
  • Support RTL
  • Document
  • Optimize
  • SEO
  • Remove Footer credits
Read More

11 Apr 2016

Sakura Blogger Template v2.2

Sakura Blogger Template -This template was previously named "Phrozen 2" but because I thought the name was weird so I replaced it with "Sakura" with different designs and nicer with the color pink
Template Sakura build with bootstrap and responsive
Sakura Anime Blogger Template
Description Template

Sakura Anime Blogger Template is a template for Share Anime like a Fansub or Fanshare with Custom Post for Anime Episode.

This template is responsive, 2 column and colored pink and black.

Note : Click Button "How To Configure Template" for setting this template
Log : Update v.2.2 [5/7/16]

Documents (Only) Template (Only) Live Preview How to Configure Template
  • Responsive
  • 2 Column
  • SEO
  • News Ticker
  • Pagination
  • Spetific Anime
  • Related Posts
  • Genre Dropdown
  • Search Box
  • Document
  • Remove Footer credits
Read More

6 Apr 2016

Sparkling Blogger Template

Sparkling Blogger Template - Today i will share template Sparkling Blogger Template adapted from wordpress, design by colorlib so i just convert from wordpress to blogger because i like that template, previously I've shared template Simple Fast Blogger Template.

This is the first wordpress template that I created for bloggers. if you want Request Template, you have to wait lol.
template
Sparkling Blogger Template
Description Template

Sparkling Blogger Template is a template minimalist from wordpress. designed by colorlib with awesome feature like slider from unslider, and support RTL and elegant look build with Skeleton and Bootstrap Responsive and more

This template is responsive, 3 column post, sidebar, and footer and colored red and white.

Note : Click Button "How To Configure Template" for setting this template and Document from Folder

Fix Unslider for RTL BLOG : Find this

<div class='banner' dir='ltr'> then change ltr be rtl
Download Live Preview How to Configure Template
  • Responsive
  • Mobile Friendly
  • Support RTL
  • 3 Column
  • Unslider
  • Optimize
  • SEO
  • Search Box
  • Bootstrap
  • Skeleton
  • Document
  • Remove Footer credits
Read More

30 Mar 2016

Simple Fast Blogger Template v.1.2

Today i will share template Simple Fast Blogger Template - This is my first template which I categorize "Minimalist". so if you want to find a simple template can see it in Minimalist label.

This template made simple, not use features like other template there is only the share button below the title of each post and edit post when the cursor is directed at the post footer

Read Also How to Download files from solidfiles.com

Simple Fast Blogger Template
Description Template

Simple Fast Blogger Template is a template for blog minimalist but u can use for fansub or share anime if you like, with facebook share button everypost in homepage, related post in post, and easy to use.

This template is responsive, 2 column and colored blue and white for background.

Note : Click Button "How To Configure Template" for setting this template

Download Live Preview How to Configure Template
  • Responsive
  • Mobile Friendly
  • Support RTL
  • 2 Column
  • Optimize
  • SEO
  • Related Post
  • Fast
  • Search Box
  • Document
  • Remove Footer credits
Read More

26 Mar 2016

3 Step Easy How to Download Files from Solidfiles

How to Download My template from solidfiles.com - I previously often use file hosting mediafire to upload a template but because some of the things that made me uncomfortable with file hosting mediafire so I replace with kumpulbagi. few days later people questioned kumpulbagi because it is difficult for download so I switched to solidfiles to upload my template. Read Also Fanbase Anime Blogger Template
how to download files from solidfiles for those who do not understand how to download in solidfiles please follow the instructions below
  1. I will take the example this link https://www.solidfiles.com/v/Gw8DW7dBzR2An
  2. At the time of entry in solidfiles step 1 how to download files from solidfiles
  3. Press the download button blue like the picture above, enjoy (y)
  4. After the click, then the file will be downloaded automatically on browser. And also we sometimes have to wait a few seconds until the download process runs.
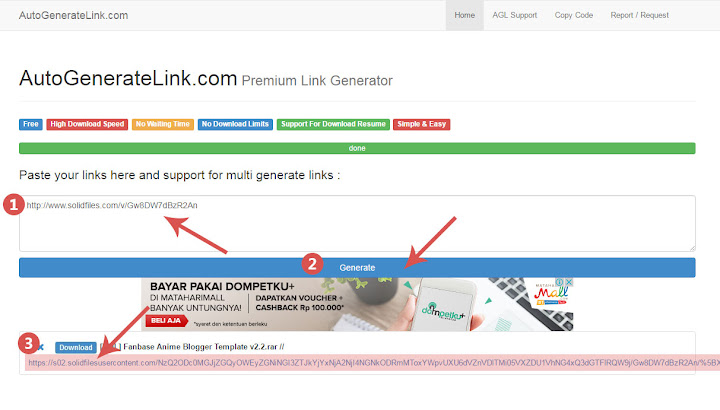
if not cannot download. you also can try alternatives by downloading files via autogeneratelink fast download in autogeneratelink
  1. Go to Web Autogeneratelink
  2. Paste your link into the box, then click generate button
  3. then the link will appear below the box and download
so this article may be useful to the reader, sorry if the tutorial is still a mess please ask if confused. thank you
Read More

18 Mar 2016

Fanstrap Anime Blogger Templates v2.2

Fanstrap Anime Blogger Template - Previously I've shared template Ryotaku Fanshare version 2.1 created from this template framework (Fanstrap) with bootstrap responsive. this time I will share Fanstrap Anime Blogger Template template to version 2.1 the version I improve responsive that is still a mess. if it finds a bug please comment I will fix as soon as possible Read Also How to Download files from solidfiles.com
Fanstrap Anime Blogger Template
Description Template

Fanstrap Anime Blogger Template is a first template with bootstrap this template recomended for Blog Anime like a Fansub or Fanshare with status project, slider, and awesome popular post

This template is responsive, 2 column and colored blue and white

Note : Click Button "How To Configure Template" for setting this template

Fix v2.1 (Fix No Image Resolution) Go to Blog > Edit HTML > Find w200-h150 then change with w230-h160

Log : Update v2.2 [5/7/16]

Document (Only) Template (Only) Live Preview How to Configure Template
  • Bootsrap
  • Responsive
  • Mobile Friendly
  • Support RTL
  • 2 Column
  • PSD Header
  • Optimize
  • SEO
  • Download Box in Post
  • Pagination
  • Recent Anime with spetific label
  • Custom Page Contact
  • Custom Page Staff
  • Status Project
  • Search Box
  • Document
  • Remove Footer Credits
Read More

Pengertian Congratulation(Ucapan Selamat) Contoh Kalimat dan Contoh Dialog 2016


Congratulations
(Ucapan Selamat) dalam bahasa inggris.

Hallo Balik Lagi di Blog TenyomErectus,  Diposting kali ini,  saya akan membahas Tentang Congratulations atau Ucapan selamat dalam Bahasa Inggris
Saya akan Membahas Congratulation mulai dari


  • pengertian
  • Contoh Kalimat
  • Contoh Dialog


Dalam kehidupan sehari-hari, kita selalu berinteraksi dengan orang lain.
Tentu sudah menjadi kebutuhan kita untuk selalu bersosialisasi dengan
lingkungan, baik lingkungan keluarga, sekolah, maupun dalam dunia
pekerjaan. Terkadang kita harus memberikan apresiasi untuk orang lain
atas apa yang telah mereka capai, misalnya dalam lingkungan sekolah, ada
teman kita yang memanangkap olimpiade nasional, atau juara pidato antar
sekolah, tentu kita harus memberikan ucapan selamat atas kesuksesan
mereka. Dalam bahasa Inggris biasa disebut dengan congratulate (memberi
selamat) atau congratulation. 


Pengertian Congratulation:

Congratulation
atau ucapan selamat
adalah ucapan atau ungkapan yang
diberikan kepada orang yang sedang mendapatkan atau mengalami sesuatu (mendapat
kebahagiaan). Dalan hal ini tidak terbatas pada mendapatkan jabatan, barang
baru saja, tetapi juga termasuk saat seseorang sedang merayakan sesuatu. Ex:
sedang merayakan hari besar.


Contoh Kalimat Congratulation / ucapan selamat dalam bahasa Inggris
(Congratulation):

BAHASA
INGGRIS
BAHASA
INDONESIA
Happy Ied day!
Selamat hari raya idul fitri!
Merry Christmas!
Selamat hari natal!
Happy new year !
Selamat tahun baru!
Happy feast day !
Selamat hari ramadhan!
Happy anniversary !
Selamat ulang tahun !
Happy birthday!
Selamat ulang tahun !
Have a nice sleep!
Selamat tidur!
Have a nice dream!
Semoga mimpi indah!
Sleep tight!
Selamat tidur lelap!
Have a good trip!
Selamat berbahagia!
Congratulation!
Selamat!
Congratulations on passing your exam!
Selamat atas lulusnya ujiann anda!
Congratulations on getting a
scholarship!
Selamat mendapat beasiswa!
Congratulations on your engagement!
Selamat bertunangan!
Congratulations on your success!
Selamat atas kesuksesan anda!
Congratulations on the birth of your
son!
Selamat atas lahirnya anak anda!
Congratulations on your promotion !
Selamat atas kenaikan pangkat anda!
Congratulations on getting a new job!
Selamat mendapat kerja baru!
Congratulations to you!
Saya ucapkan selamat ke[ada anda!
Congratulations on your getting title
Selamat atas gelar anda!
I convey my congratulations to you!
Saya ucapkan selamat kepada anda!
My heartiest congratulations to you!
Ucapan selamatku yang mendalam
untukmu!
Congratulations on your appointment
as a main director!
Selamat atas dipilihnya anda menjadi
direktur utama!
.
.
.

Contoh Dialog Ucapan Selamat (Congratulation)


Memberi ucapan selamat atau congratulation sangatlah penting.
Memberikan ucapan selamat atau congratulation sama pentingnya seperti
mengucapkan rasa terimakasih kepada seseorang (gratitude or thanking).
 Sekilas mungkin terlihat sederhana, namun mempunyai dampak yang luar
biasa bagi mereka. Karena mereka merasa usaha atau kerja keras mereka
dihargai oleh kita. Nah, dalam artikel kali ini, saya akan mencoba
berbagi contoh percakapan bahasa Inggris memberikan selamat (congratulation) kepada seseorang atas kesuksesan yang telah mereka capai. Langsung saja kita lihat bersama contoh dialog bahasa Inggris memberi selamat berikut ini ya.

Contoh Dialog Percakapan Bahasa Inggris Memberi Selamat (Congratulation)

Expression:
1. Congatulation!
2. Congatulation on your success in debate contest!
3. congratulation on your marriage.
4. You have done a fantastic job, man!
5. well done, congratulation on you
6. I would be the first to congratulate you on your...(formal)
7. I'd like to congratulate you on your...(formal)
8. Please accept my warmest congratulation on your... (formal)

Response:
1. Thanks, I hope you'd be the next
2. I am not that good
3. Oh, it's not special actually
4. thank you very much for saying it.


Contoh Dialog Ucapan Selamat (Congratulation)

Rere dan Rani telah berteman sejak
lama. Rere memberitahu Rani bahwa ia telah memenangkan lomba pidato bahasa
Inggris se-Indonesia. Mendengar itu, Rani langsung memberikan ucapan selamat
kepada Rere. 

Rere : Hai Rani, Have you heard a
good news of mine?
Rani : You told me nothing, but let
me guess.. hmm wait, wait.. you got a surprise from you father?
Rere : You're wrong!
Rani : Hmm, enough, just tell me,
dear..
Rere : You know that I had speech
contest in Jakarta last week? I have won it!!
Rani : Are you serious? Did you win
it? Oh my god, I can't believe it.
Rere : Of course I am..
Rani : Great, Congratulation. You
have no idea how happy I am for you
Rere : Thanks, I appreciate that
Rani : I believe you are the best as
always.
Rere : How nice of you to say that..
Now, lets have a lunch on my treat,
Rani : With great pleasure,
dear.. 

Artinya: 

Rare : Hai Rani, sudah dengar kabar
baik dariku?
Rani : Kamu belum memberitahuku sama
sekali, hmm tunggu, kamu dapat surprise dari ayahmu ya?
Rere : Salaah..
Rani : Oke, beritahu dong.
Rere : Kamu tahu kalau aku mengikuti
lomba pidato di Jakarta minggu lalu, kan? Aku juara lho.
Rani : Hah? Serius? Kamu juara? Ya
Allah..
Rere : Tentu saja dong.
Rani : Selamat ya, kamu tahu betapa
bahagianya aku untukmu.
Rere : Terimakasih, aku
menghargainya.
Rani : Aku percaya kamu selalu yang
terbaik seperti biasanya.
Rere : Baik sekali kamu berkata
demikian. Makan siang yuk. Aku yang traktir.
Rani : Dengan senang hati.
Read More